The lighthouse island, built live
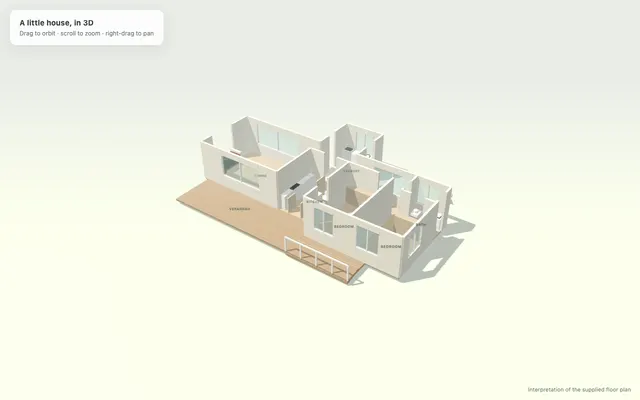
Both models were plugged into Blender's official MCP add-on and got the same prompt. Use the buttons to switch models, and "One color" to see the print.
 3DLighthouse Island in BlenderOpen →
Blender is open and connected to you over MCP (the blender tools). Please build directly in this open Blender, step by step: after each group of objects, take a viewport screenshot to check how it looks. I want to watch it grow in the window.

First clear the scene (delete the default cube, camera and light), then build a desktop miniature: a lighthouse island by the sea. A round base about 8 cm across, with the sea and a small island on it: a red-and-white striped lighthouse, a keeper's cottage, a few rocks, a few trees, and a little wooden boat by the shore. Cartoony and cozy, something that looks nice on a desk. 1 Blender unit = 1 meter; build it at real print size (base diameter about 0.08).

- It must 3D print directly (FDM, Bambu printer, 0.4 mm nozzle, PLA), the whole scene as one piece: closed solids (several overlapping closed solids are fine), a flat bottom sitting at z = 0, nothing thinner than 1.2 mm, and as few overhangs past 45° as possible. Blender has the 3D Print Toolbox extension (print3d_toolbox) installed; you can use it to check.
- Give the objects material colors, and add lights and a camera so the render looks good (the print is single-color; colors are only for the render).

When you're done:
1. Save the file as <your folder>/scene.blend;
2. Export the printable part as <your folder>/print.stl (in millimeters);
3. Use render_viewport_to_path to render a picture to <your folder>/final.png;
4. Finally, tell me in a few sentences: how many rounds of changes you made, what changed in each, what problems you hit, and whether it can be printed as is.

Do all the modeling in this open Blender with the blender tools; don't start another Blender. Only read and write files in <your folder>. Keep the whole thing under 40 minutes.
Blender is open again with the scene.blend you just saved, still connected to you over MCP.

I compared the render with what the print will look like and found a problem: the print is single-color, so all the colors disappear. The red and white stripes, the doors and windows, the sea and the beach all become the same color, and right now this version prints as a few bare shapes.

Please change this scene so the details still show in a single-color print: use bumps, height and texture, for example the lighthouse stripes, the doors and windows, the roof, and the edge between the waves and the beach. Same print requirements as before: one piece, closed solids, a flat bottom at z = 0, nothing thinner than 1.2 mm, as few overhangs past 45° as possible.

Keep taking viewport screenshots as you go. When you're done:
1. Save back to <your folder>/scene.blend;
2. Re-export <your folder>/print.stl (in millimeters);
3. Use render_viewport_to_path to render a picture to <your folder>/final.png;
4. Tell me in a few sentences what you changed and whether it can be printed as is.

Do all the modeling in this open Blender with the blender tools; don't start another Blender. Only read and write files in <your folder>. Keep it under 30 minutes.
Mia's tips
- I ran Opus 5.5 in Claude Code and GPT-6 Astra in Codex with reasoning on max.
- Both models exported an empty STL the first time: the parts sat in a collection hidden from rendering, and the exporter skips those. If you ever get a tiny STL of a few dozen bytes, that's why.
- Say it outright: the details have to be in the shape, not the color. "The print is single-color" alone can get treated as a footnote, and the windows and tiles end up as paint.
- This add-on runs whatever code the AI writes, with no safety checks. Don't open it in a Blender with files you care about.
- I sliced both with the same settings (0.4 mm nozzle, 0.16 mm layers, PLA): no supports needed, about an hour and a half and 27 grams each.
From scripts: phone stand, cat, tiny room
No window this time: each model writes a modeling script, Blender runs it in the background, and a checking tool hands back a render and a print report for the model to read and fix.
3DLighthouse Island in BlenderOpen →# Task
A desk ornament: a cat wearing over-ear headphones, sitting, cute cartoon style, about 6 cm tall.
# What to deliver
Write a Blender 5.2 Python script `model.py` in the current folder that builds it with bpy / bmesh / mathutils in an empty scene (no default cube, camera or light). No external files, add-ons or network.
- Units: 1 Blender unit = 1 meter; build at real size.
- It must 3D print directly (FDM, Bambu printer, 0.4 mm nozzle, PLA):
- the printed part is closed solid (it can be several overlapping closed solids; the slicer merges them), no single-sided faces or holes;
- a flat bottom at z = 0;
- nothing thinner than 1.2 mm; as few overhangs past 45° as possible.
- Give the objects material colors (only for the render; the print is single-color). Don't build a floor, lights or a camera; the checking tool adds them.
# How to check
You can run this any time (it clears the scene, runs model.py, renders a picture and runs a print check):
blender -b --factory-startup --python bl_harness.py -- --build model.py --render preview.png --engine eevee --samples 16 --res 960x540 --camera auto --studio --view iso --report report.json
- `--view` can be front / back / left / right / top to see other sides (use a different `--render` file name to keep several);
- in report.json, when `build_ok` is false, `build_error` has the error; `print` is the print check: in `toolbox`, Non-manifold Edges and Bad Contiguous Edges must both be 0 for it to be closed; Intersect Faces are faces crossing each other (fine for overlapping solids); Thin Faces are faces thinner than 0.8 mm; `bed_contact_mm2` is the area touching the bed; `overhang_area_pct` is the overhang share; `size_mm` is the size.
- Open the rendered pictures and look at them yourself.
# Keep a record
- After writing the first version, before running any check, copy it to iter_01.py; before each later check, copy that version too (iter_02.py, iter_03.py…).
- When done, write notes.md: how many versions, what changed in each, what went wrong, what still isn't good enough, and whether it can be printed as is.
- Only read and write files in the current folder. Keep the whole thing under 40 minutes.
A phone stand for a desk: it holds a phone steady in landscape or portrait, with an opening at the back for the charging cable. Printable in one piece, no supports.
A desktop miniature (diorama): on an 8 × 8 cm square base, build a cozy isometric little room with two walls, a floor, a window, a desk, a chair, a computer, a lamp, a bookshelf and a potted plant. It should look good rendered and print as one piece.
Mia's tips
- Swap the check command for the path on your own computer. The checking tool is just a Blender Python file: it runs the model script, renders a picture, and uses the 3D Print Toolbox to look for holes and thin walls. You can skip it, but then the AI has one less pair of eyes.
- Both models hit the same snag: merging dozens of parts with Blender's default exact boolean leaves holes, and the Manifold solver fixes it. If your model's merge breaks, just tell it to switch.
- Astra's cat mesh has 860,000 faces and the file is over 40 MB, so I didn't put it up for download; the viewer shows a lighter copy.
- On the Opus cat, the tabby stripes and white belly are only paint, so it prints as a plain cat; Astra's eyes, mouth and stripes are raised.